Réunion 2019: The route and tips for hikers
… and a long journey to Réunion
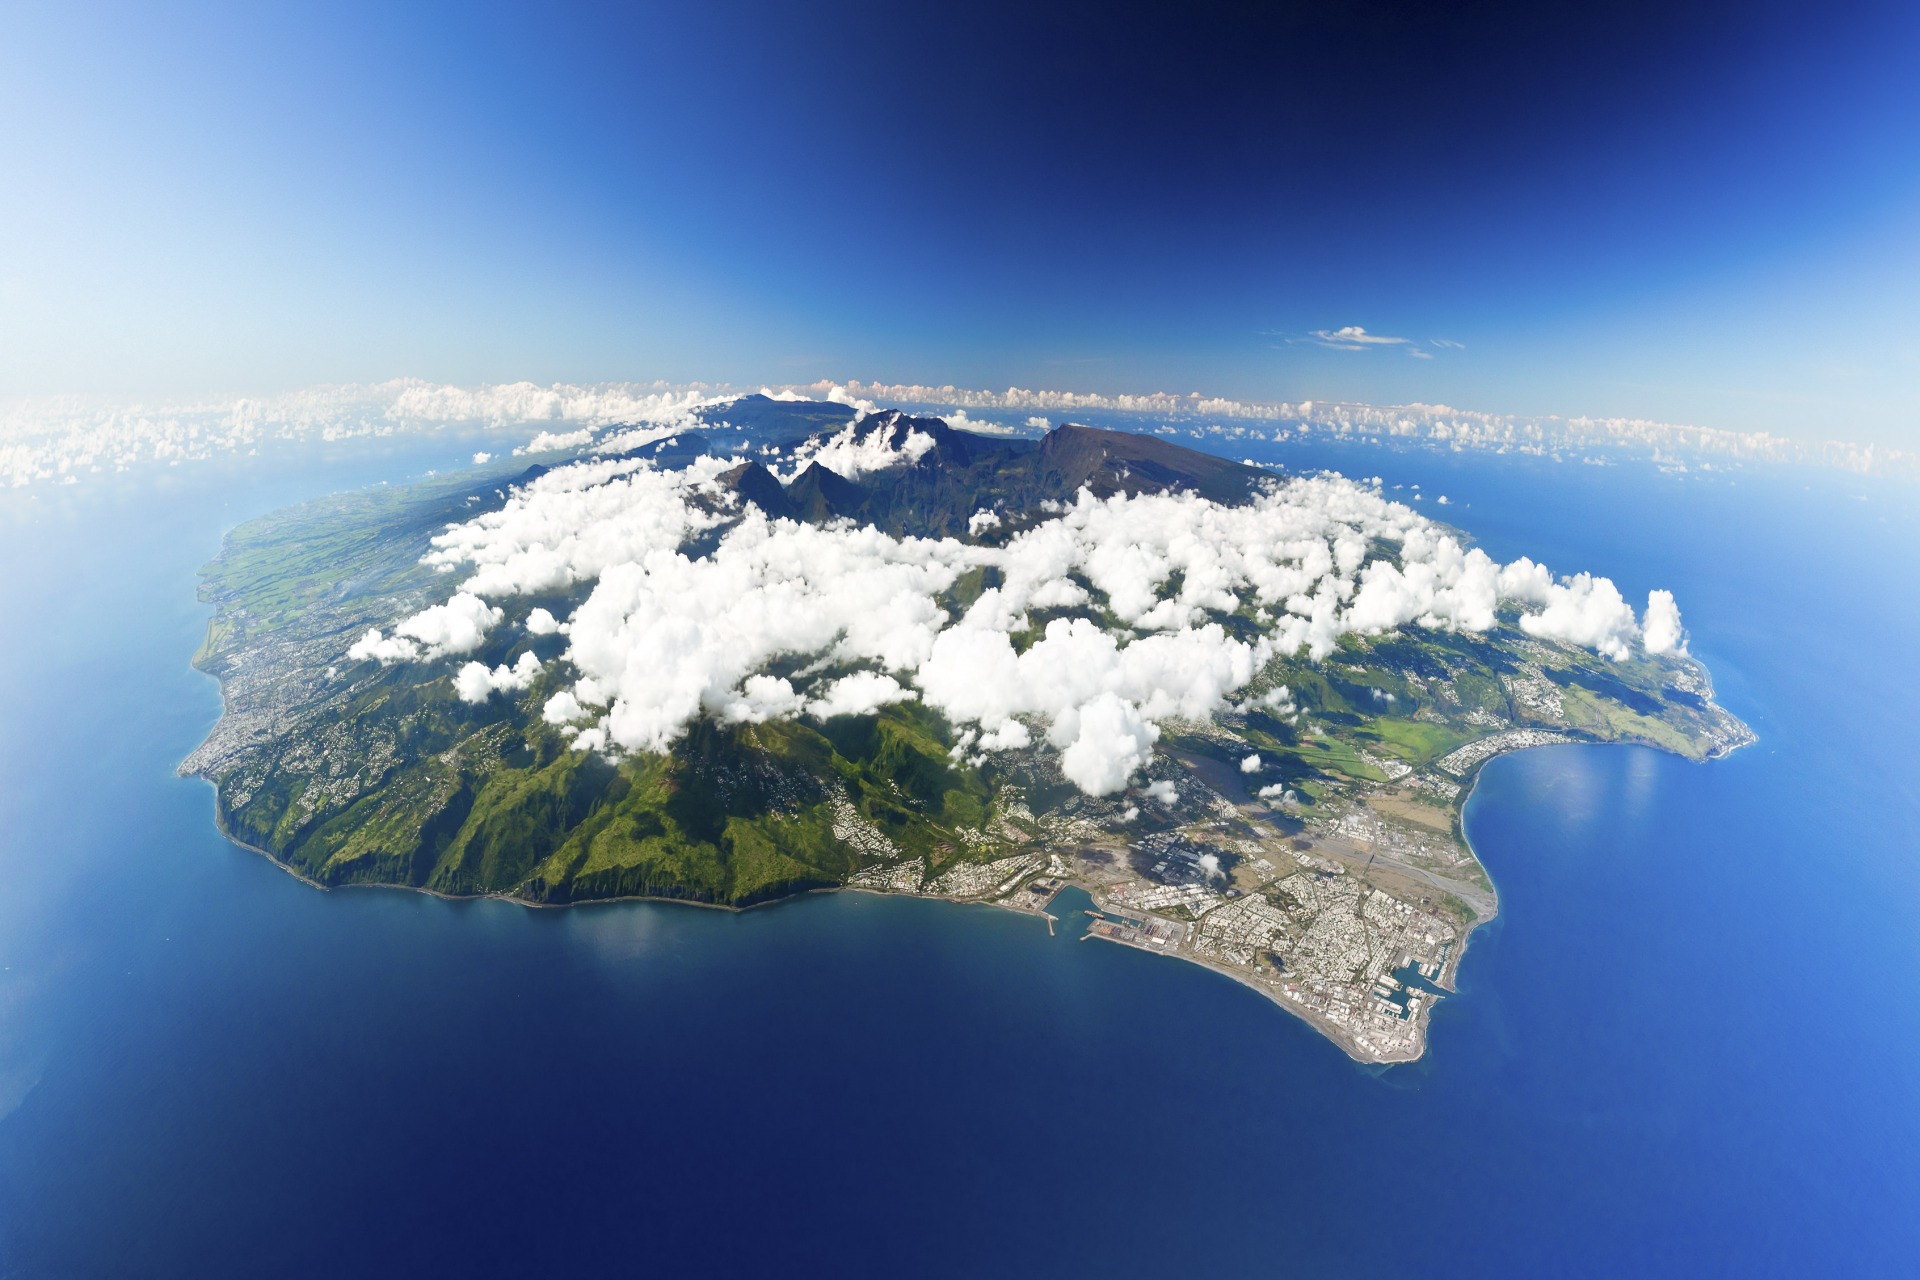
The Sentier de Grande Randonnée No. 2 (R2) is the crossing of the island from the capital St. Denis in the north to Basse Vallée in the south. The tour is scenically incredibly varied, especially the variety of different forests on Reunion fascinates. The typical tropical mixed forest of the island (“Bois de couleurs des hauts”) grows up to about 1,800 m altitude. Depending on the altitude and location, one can find cryptoméria (Japanese sickle fir), eucalypts (blue gum trees), tamarind trees, bamboo and some more. Between the trees there is a variety of ferns, grasses, shrubs and in the rain and cloud forests also colorful mosses and orchids. At higher altitudes you walk through barren heath landscapes and in the volcanic areas the tracks get lost in unreal looking moonscapes, created by enormous forces.
If you have only just started – in the prologue you will already find some information about the island and its formation!
If you have only just started – in the prologue you will already find some information about the island and its formation!
The route
In Cirque de Mafate, the R2 meets the R1 or R3 several times – if you have more hiking days available, you can include one or the other “detour”. This was our route (classic R2):
- Day 1: From the Mamode Camp hiking parking lot to the Gîte de la Roche Écrite
- Day 2: Across the Plaine des Chicots to Roche Écrite, back to the gîte and to Dos d’Âne
- Day 3: Descent into the Cirque de Mafate to Îlet à Malheur (via Aurère)
- Day 4: Îlet à Malheur to Grand Place Cayenne (via Îlet à Bourse and Grand Place)
- Day 5: Ascent to the higher Îlets in Mafate: Roche Plate (via Îlet des Orangers and Îlet des Lataniers)
- Day 6: Marla (via La Nouvelle)
- Day 7: Cilaos (via Col Taïbit)
- Day 8: Rest day
- Day 9: Ascent to the Refuge de la Caverne Dufour
- Day 10: Summit day Piton des Neiges, then long descent to Bourg-Murat
- Day 11: Ascent to the Gîte du Vulcan
- Day 12: Ascent of Piton de la Fournaise, visit of the crater
- Day 13: Descent to Gîte de Basse Vallée (and the next morning the last two hours descent to Basse Vallée)
- Day 14 – 17: Rest and good food in St. Pierre, St. Gilles and St. Denis
 © OpenStreetMap contributors, Track Lustwandler.at
In the planning, this tour has a length of about 180 km, but more exciting are the altitude meters: 11,400 m ascent and 12,500 m descent. The whole thing in only 11 days, which makes an average of more than 1,000 meters of altitude per day. This much can already be revealed, we will regret this planning.
In the following elevation profile the strong ascents and descents are well recognizable, as well as the highest points of the tour: Roche Écrite (2,276 m), Col Taïbit (2,081 m), Piton des Neiges (3,070 m) and Piton de la Fournaise (2,632 m – the highest point is not accessible, however, the trail ends a little above 2,500 m). Map data © OpenStreetMap contributors, Track Lustwandler.at.
In the following elevation profile the strong ascents and descents are well recognizable, as well as the highest points of the tour: Roche Écrite (2,276 m), Col Taïbit (2,081 m), Piton des Neiges (3,070 m) and Piton de la Fournaise (2,632 m – the highest point is not accessible, however, the trail ends a little above 2,500 m). Map data © OpenStreetMap contributors, Track Lustwandler.at.
 Evaluation of our cleaned track
Accommodation
In the national park, camping (away from designated sites in the Îlets) is prohibited. We didn’t take a tent at all and booked places in the simple accommodations early in the year. Partly there are very few places, during the season it is not recommended to go without booking. The prices are moderate, wherever possible we took double rooms. The booking can be done comfortably online at http://book.reunion.fr/en/accommodation
A tip: Don’t just book away, but check beforehand whether all the accommodations on your route are available in your planned schedule. Especially the two huts at the volcanoes are often booked out very early, especially on weekends – but then they seem to be released again, so we met someone who booked the Caverne Dufour only a few weeks before the trip, which was booked out for us months before on that day.
A tip: Don’t just book away, but check beforehand whether all the accommodations on your route are available in your planned schedule. Especially the two huts at the volcanoes are often booked out very early, especially on weekends – but then they seem to be released again, so we met someone who booked the Caverne Dufour only a few weeks before the trip, which was booked out for us months before on that day.
However, booking the accommodations is not the end of it. Breakfast and dinner have to be booked separately, directly with the accommodation providers. You can’t do that online or via email, you have to call. I had French in school for a few years. Even if the lessons were some years ago, it is usually enough for simple communication. However: Creole French on the phone is hell. I failed grandiosely. A friend who worked in tourism in France for a while then took a few quarters and she too struggled. She had a long phone call with one quartier and then told me at the end that she actually didn’t know for sure now if dinner was booked. After that, there were still a few reservations open and my friend on vacation. In desperation, I then wrote to the tourist office on Reunion, in French. A few days later, I received an email back in the finest German: they had called all the missing accommodations and ordered the food. I was so happy! 🙂
In some of the Îlets there are simple, small shopping facilities. These mostly offer soft drinks, the typical beer of the island called “Dodo”, cookies, chocolate and a few food items. From time to time you will find a snack bar – you will find the description at the individual stages.
Equipment
We tweaked our backpack weights for a long time in advance: Elisabeth had 6.5 kg (with a few common items like first aid, pharmacy and shower stuff) and I 9 kg (both without water). Included in my 9 kg are 3 kg of photo gear and a 500 g powerbank for headlamps, GPS trackers and camera batteries. The camera equipment is significantly slimmed down compared to the last tours, I switched to a Nikon Z7 with Z 24-70/4 before our Iceland tour this year and then took the Z7 with the new Z 24-70/2.8 to Réunion, again in the fantastic Camslinger photo bag.
Our emergency GPS was with us as always, but we didn’t need it. The trails are excellently marked and easy to see. The OSM map on the smartphone as a backup would have been enough. I would also save on the powerbank next time, my three original Nikon batteries were already too much, two would have been enough. In the Cirque de Mafate you can not recharge (or at best for an additional fee, as in Îlet à Malheur), but very well in the larger towns such as Dos d’Âne, Cilaos and Bourg-Murat. For GPS trackers/headlamps, a small lightweight power bank would suffice.
In terms of clothing, you have to cover a wide spectrum on Reunion: hot hours in the barren heathlands or the Piton de la Fournaise volcanic area, cool hours in the high altitude forests, cold nights, sometimes very high humidity and of course rain is to be expected in principle (although we were very lucky here and hardly got into the rain). Suitably, we had fast-drying long hiking pants (Elisabeth zip-off to 3/4, I with vents on the thighs), hiking shorts, baselayer completely merino (2 x), our beloved Haglöfs Polartec fleeces, Goretex Paclite pants and jackets and a long-sleeved merino. As hiking boots, we both had Scarpa Mescalito on our feet for the first time, and as fording shoes or second shoes for the flight, evening and the days in the cities, the fantastic barefoot shoes Vivobarefoot Öttillö Swimrun.
We both had trekking poles with us, Elisabeth the proven Leki Sherpa and I Leki Micro Stick Carbon with fixed length of 125 cm, which are much lighter and more compact than the Leki Sherpa. For Réunion, I had the plan to walk larger parts of the route without poles, but in practice I mostly walked with poles, especially to protect my knees during the constant ups and downs. Our recommendation: take your trekking poles with you – we have seen some people with serious knee problems …
Maps
We used both the paper maps and Openstreetmap for planning our tour. The paper maps are published by IGN (Institute Geographique National), 1:25,000, a total of 6 maps cover Île de la Réunion. The main part of the R2 is covered by “4402 RT ST-DENIS”, it continues with “4405 RT ST-PIERRE” and “4406 RT PITON DE LA FOURNAISE”.
You can find the OSM map online at https://www.openstreetmap.org/#map=13/-20.9323/55.5119&layers=C, for the contour lines it is best to switch to the “Cycle-Map”. For your GPS device or planning with Basecamp you can download the map at http://garmin.openstreetmap.nl.
On the smartphone (iOS) we tried OsmAnd this year. The project is based on Openstreetmap and you can download elevation data and use the maps offline with a very inexpensive subscription (which you can only subscribe for the duration of the tour, approx. 2 EUR).
Trail conditions
At the beginning of the trails there are posts about waist high, symbolizing a gate. When the crossbar is in place, the trail is closed for safety reasons.
In general, the trails are in very good condition. The marking is very good throughout, the routing clear. One follows the white-red marking of the R2. Fog and clouds are frequent, however, the paths are usually easy to see or they lead so narrow through the dense vegetation that you could not deviate left or right anyway.
In any case, caution is advised: When wet, some paths can become very muddy and, if the slope is steep enough, very slippery. Many trails are crisscrossed with roots that are not only tripping hazards, but also very treacherous when wet, especially downhill. Some paths lead exposed over a ridge or along a slope. This is quite wildly thematized in some articles and we were a bit concerned regarding some sections of the route. On site, we have then found it not bad, also there were in some cases very good protections in the form of ropes and small ladders. We will briefly describe the key sections for you on the individual days, so that you can gain an impression for your tour.
Climate
Due to the location of the island, the position of the sun hardly changes during the year and therefore there are only two seasons on Reunion: summer from November to April and winter from May to October. The climate on Reunion is tropical with a rainy season from December to March, during the summer months. Reunion is notorious for the extreme amounts of rainfall that can fall within one or a few days and has set world records here. For example, in 2007, almost 4,000 mm of rain fell within three days. So that you can classify this: Austria has less than 1,200 mm as annual(!) rainfall. During the summer months there is also the danger that cyclones, originated in the Indian Ocean, hit the island – but due to the small size of the island this rarely happens.
The main season for hikers is from mid-October to the end of November (end of winter/beginning of summer), we started already on September 17th and in the Cirque de Mafate there was still quite little going on, we can only recommend it. We had mostly pleasant 12 – 20° C during the hike, in higher altitudes of course with very cool nights.
The great peculiarity of the island is the high number of microclimates, we are talking about more than 200. Winter on Reunion (May to October) is considered the drier season, but still it rains regularly here. Generally, clouds often form in the course of the morning until noon, starting from the east coast and the Indian Ocean, and then move across the island. The probability of precipitation in the east and also in the inner parts of the island is much higher than in the west. For hikers, this always means a bit of stress: either you get to the viewpoints early, or there’s a good chance you won’t see much. The advantage: at high altitudes you walk in the rainforest in the clouds, the atmosphere is incredible!
Another special feature of the island is the fact that – despite the tropical climate – there are no poisonous spiders or snakes. Likewise, there are no large predators (felines), crocodiles or leeches – so you can explore the island without any worries!
Arrival
Before we go directly to the rainforest in the next post, a few words about the journey. Our journey was from Vienna via Paris directly to St. Denis: departure at 15:30 in Vienna, onward flight in Paris at 19:30 and arrival on La Réunion at 8:25 in the morning (local time).
With all of our flight experience and associated luggage issues, we went purely hand luggage again this time, both Elisabeth’s Osprey and my new Fjällräven Bergtagen fit the size limit. I had brought the Leki folding poles in the backpack in Vienna unobjected through the security check, Elisabeth’s Leki Sherpa we checked in. We could not afford a delay in any case, we had already booked in the 1st night a quarters at 1,800 m altitude and then all quarters throughout. Not to imagine to stand there without hiking luggage – and regarding flight delays we had the emergency plan of a night hike …
The flight was on time, but the package with Elisabeth’s Leki was untraceable. So we met the Lost & Found at the airport Roland Garros. The lady took it easy and meant that we should just call every day and they would then see that we get to our poles. We then explained to her in a friendly manner that this was not feasible and managed to get them to take care of finding the poles on their own and to try a delivery at the next two quarters with road access: Day 2 in Dos d’Âne or Day 7 or 8 in Cilaos.
While we are sitting in the office, our desperate cab driver already calls – the conversation in French on the phone goes as usual and I pass the phone directly to the lady from Lost & Found for simultaneous translation services. 😉
With about 45 minutes delay we meet our driver in front of the building. The starting point of our hike could be reached by public transport, but it is relatively tedious: from the airport to St. Denis and then with Citalis line 12 (St. Denis/Gare routière – Bassin Couderc) and further with cab bus 12a (Bassin Couderc – Aubanc or Val fleuri). The cab (booked in advance at home) costs 70 EUR. The ride goes first along the coastal road and then up a narrow and winding road.
By the way, there are two places where you can start the tour, I didn’t realize that when planning our tour. I expected the hiking parking lot Mamode Camp at 1,200 m from various reports for the only starting point. However, on the map you can see that there is also a trail from “La Providence”, at about 100 m altitude, so you could do a good 1,100 additional meters of altitude on the 1st day.
Our driver was funny – obviously he himself has never been there and quite inconspicuously held the cell phone half-covered and looked there on the navigation app. At 10 o’clock, the friendly driver lets us out at the hiker parking lot and we are already alone in the forest. Adjust the backpack properly, lace up the shoes tightly, turn on the GPS logger, a kiss and off we go!
This article has been semi-automatically translated as a service for foreign users. See details here.
Leave a Reply
Want to join the discussion?Feel free to contribute!